

I am blown away by the response to my Quick and Easy Loom Knitting post from last year. It is consistently one of the top posts from the site, even now, a year later! When it passed 3000 pins I thought I was going to fall over! I had no idea there was that much interest in beginner loom knitting!

I get emails all the time asking for how I make the pattern for the pink scarf. I’ve never written a pattern before, so I’ve been a big fat scaredey cat in attempting to describe what I do–but I’m going to give it a shot!
I created this braided knit technique a few years back when I was looking for something a little more stylish than just traditional rows. I wanted something similar to cables on sweaters, but wasn’t sure how to get them. After a lot of playing around and more “oops” than success, one of those “oops” moments struck me as something to try more of. And it stuck! This is now my go to pattern for knitting on the rake loom. It also happens to be super simple. Trust me, I’m not one to count stitches or remember what row I’m on. I’m the classic definition of ADHD, and I tend to knit while talking to people or watching tv, so any pattern that requires attention to detail just isn’t going to work for me! This one creates a pretty double knit without being difficult. This stitch requires a rake (long oval) loom. You will see the yarn crosses itself with each wrap of a peg. This pattern is also really fast–you can whip up a scarf for a gift in only a few hours!
This is my first time trying to describe a pattern, so bear with me as I try to explain! If you don’t understand or want clarification, leave a comment and I’ll try to help!
1. Cast on as usual and produce the first row of knit like you normally would. (If you’re new to loom knitting, check out this post on how to start loom knitting.)
2. From the first peg, wrap under and around toward the peg at the top, but to the opposite side of the peg. As you can see in the photo, your yarn comes out the left side of the bottom peg but starts the wrap on the right side of the top peg.
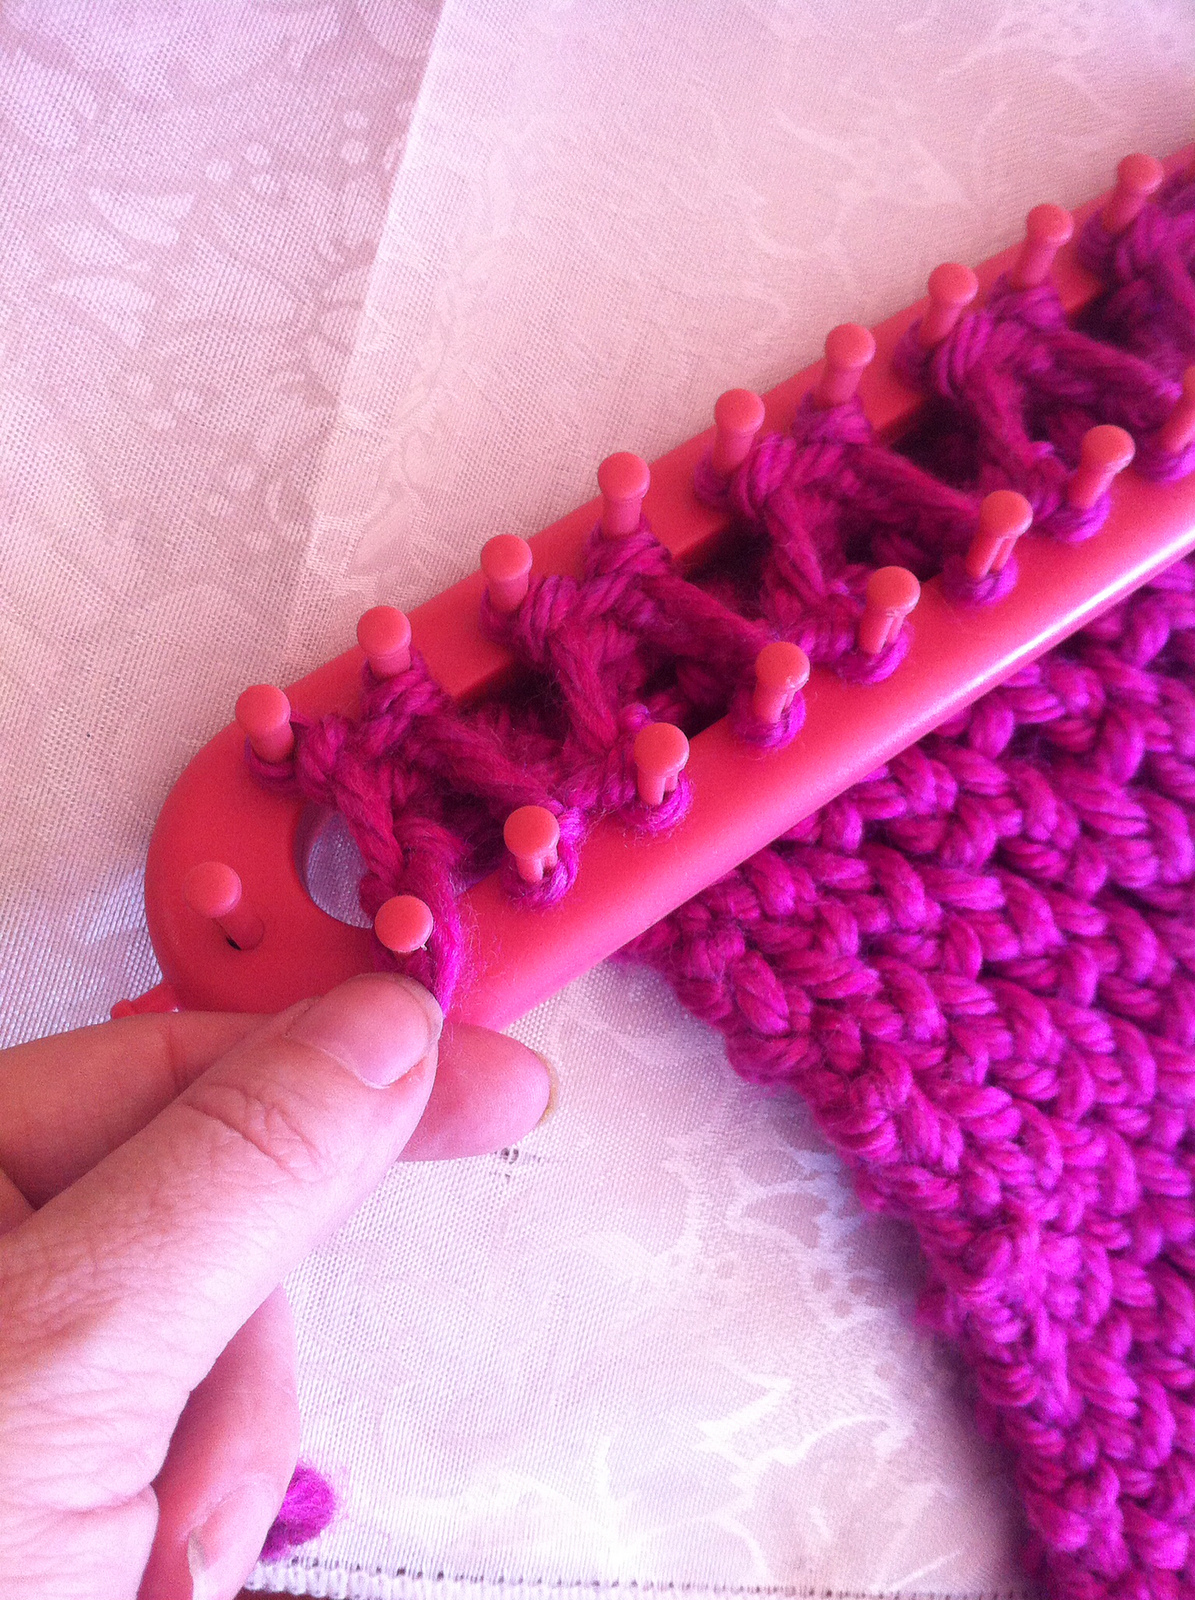
3. Wrap the top peg.

4. Move straight to the next top peg and wrap it from the bottom side around to the top and back over itself.

5. The yarn should be on the left side of the top peg. Now pull down to the bottom peg and wrap it from the right to the left. The yarn will finish the wrap at the top of the bottom peg.

6. Move to the next bottom peg and wrap it from the top side around to the bottom.

7. Repeat 2-6 until you reach the end.
8. You should have gaps in pegs with no yarn between them, alternating top to bottom. This creates the gap in the center of the braid knit.

8. Pull the bottom loop over the top loop and release, just like in all loom knitting.
9. Repeat this for two rows, then reverse the pattern.
10. To do this, skip the first peg and wrap the top peg first, pulling the yarn down to the first peg and begin the wrap pattern again, only this time you’re starting the wrap on the bottom, not the top. You will notice the pattern is now taking you to the opposite side of the loom, filling in the spots where there were gaps before. This creates the shifting cable-style pattern.
11. Repeat for two rows, then reverse again to the beginning.
While I was shooting for a cable knit, I learned what I really wanted was this pretty braided knit! It works best with chunky yarns, but I’ve also used finer strands that I doubled up. That works well too.
This pattern is perfect for scarves, washcloths, pot holders and more! (If you decide to share this same pattern on your blog or elsewhere, I ask that you link back to this page as a reference in your post.) I particularly like it for infinity scarves. It is thick and warm without being too bulky, and has a nice shape when worn.
Like I said, let me know if you have any questions or feedback! And if you like the pattern, pin it!


Love the stitch. Thanks for sharing.
I’ve been periodically visiting your Pinterest pin to check for updates and was so happy to have finally found this! You did a great job explaining your pattern. Thank you so much!
Now that you’ve tackled this pic-tut, any chance of making a video for all the visual learners out there?
Again, truly, thank you for all of your time and hard work in putting this together.
Hmmm…that might make a good homeschooling project one day!
Hi, can you tell me how you made the purple scarf?
Irene, that is a ribbed knit. Knit two, purl two. There are many tutorials out there on purl knit for the loom.
Thank you so much for your reply. Is the “knit” the e stitch?
Yes. I use the e (or basic) stitch for the knit, then purl is sort of pulling it backwards. I’m bad at describing purl.
I love this pattern!!! Please, please make a video tutorial.
Sincerely,
Sintia aka visual learner 🙂
Yes…please make a video tutorial for us visual learner…that would be awesome…I’m new to this and love the pink scarf.
I am a visual learner also, and would love to see a video. I really like
this pattern. Thank you for sharing.
I’ve made this scarf and it is so bueatiful the only problem I’m having is what casting off method to use. Can you tell me which bind off you used.
I usually take a crochet hook and do a quick slip crochet on either end to finish it off.
Love this pattern and perfect for scarf. I do something similar called the honey comb scarf and its the same thing but instead of 2 rows I do 5 then switch. It looks exactly like a honey comb
I loved loom knitting ..I started it just to pass my time…but found it interesting…thanks for the new pattern it came out beautiful…
Oh, the pink scarf is so pretty. I am a visual learner. If you could make a video that would be very helpful since I will most likely be replaying the video to learn the technique. Think you may put your video on YouTube? Thank you for your time.
Would love to see if you have a video tutorial on this. I am a very visual person and am having a hard time making sense of what is written (It’s likely very well written though!)
This is lovely! I am very new to loom knitting and I was able to follow this exactly as you wrote it! Thank you so much I can’t wait to see how my finished product looks! One question though, did you bind off by moving all the loops to one side of the loom and then doing the knit off, move over, knit two loops, move to the peg with one loop, knit off, etc etc.? I hope that makes sense. It’s th normal way I see almost every tutorial on binding off.